Image Snapshot testing with Cypress

Unit tests, integration tests, end-to-end tests — like many modern development teams, at Pigment, we rely heavily on these methods to minimize the risk of functional regressions in our codebase. In this post, we'll explore how we added image snapshots to our Cypress end-to-end tests as an extra safeguard for catching visual regressions.
The need
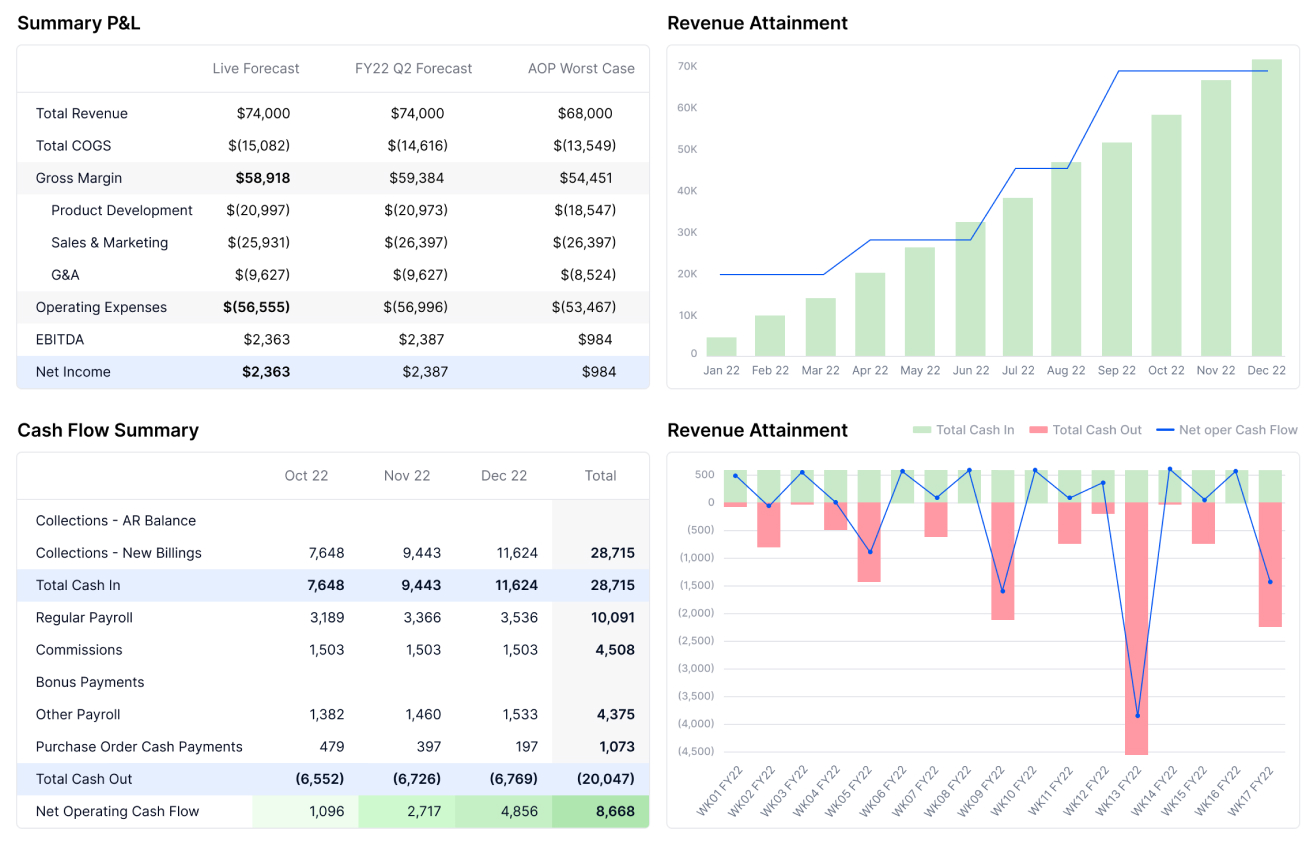
As our front-end application grew in size and complexity, we started noticing a lack of sufficient coverage against visual regressions. While our design system components are well covered with Jest snapshots, which stores markup and CSS for later comparison, we felt there was a gap when it came to ensuring visual stability at the dashboard level. To give you a clearer picture of what I mean, below is an example of a Pigment dashboard, straight from our corporate website:
So while individual component tests — including Jest HTML + CSS snapshots — cover a lot of ground, we were increasingly aware that for more complex views like dashboards, we'd need an additional layer of visual testing to safeguard against regressions.
Enter image snapshots
That's when we decided to experiment with image snapshots. Since we already run our frontend E2E tests with Cypress, we explored the various Cypress plugins available for visual testing. We settled on using cypress-image-snapshot because of its simplicity, flexibility in adjusting the matching threshold (more on that later), and its ability to generate a heatmap of differences between actual and expected results.
Interestingly, this plugin uses the diffing logic from jest-image-snapshot, so if we ever want to add image snapshots to our unit tests, we could do so easily (and without bloating our /node_modules). The plugin is well documented, and there are resources available on how to get started with it. In this blog post, we'll explore how to maximize regression detection without making our tests too flaky.
Setup
Setting up the plugin is pretty straightforward, as described in its documentation. Here's the quick rundown:
- In
cypress/plugins/index.js:
const {
  addMatchImageSnapshotPlugin,
} = require("cypress-image-snapshot/plugin");
addMatchImageSnapshotPlugin(on, config);
- In
cypress/support/commands.ts:
import { addMatchImageSnapshotCommand } from "cypress-image-snapshot/command";
addMatchImageSnapshotCommand();
Then, in your spec file, you can use the plugin's command to take a snapshot and assert that it is not "too different" from the reference snapshot. If there’s a mismatch, the plugin generates a diff image with the reference on the left, the actual result on the right, and a heatmap in the middle highlighting the differences. The snapshot command takes two parameters: a name for the snapshot and some options. We'll dig more into the options below and how they relate to "how much different" the actual and expected snapshots are. For example:
cy.matchImageSnapshot("EggsBoard", {
  capture: "viewport",
  comparisonMethod: "pixelmatch",
  customDiffConfig: {
    threshold: 0,
  },
  failureThreshold: 0,
  failureThresholdType: "percent",
});
The capture option comes from Cypress' .screenshot() command and it has 3 modes:
runnerwill capture the whole runner window, which includes the command log. This isn't particularly useful for E2E snapshots as we’re not interested in testing the command log, and there could be a lot of non-stable info in the logs such as randomly generated guids.fullPageis the default and will try to capture the whole page. It seems that if the page is taller than the viewport, Cypress will scroll the page, take as many screenshots as necessary and stitch them together. In my experience, this only works well if the scroll container is the<body>element. If you have for example a non-scrolling sidenav, and a main section that scrolls, Cypress won't magically scroll the main content and stitch it.viewPortwill capture the viewport of the tested application. In practice, there seems to be little difference between this andfullPageif your<body>doesn’t scroll, but you may need to adjust theviewportWidth/viewportHeightsettings in Cypress to avoid unwanted scrollbars in your snapshots.
Fiddling with the diff options
Now, let’s talk about comparison methods and thresholds. These options are provided by the underlying jest-image-snapshot package.
Comparison method
- The
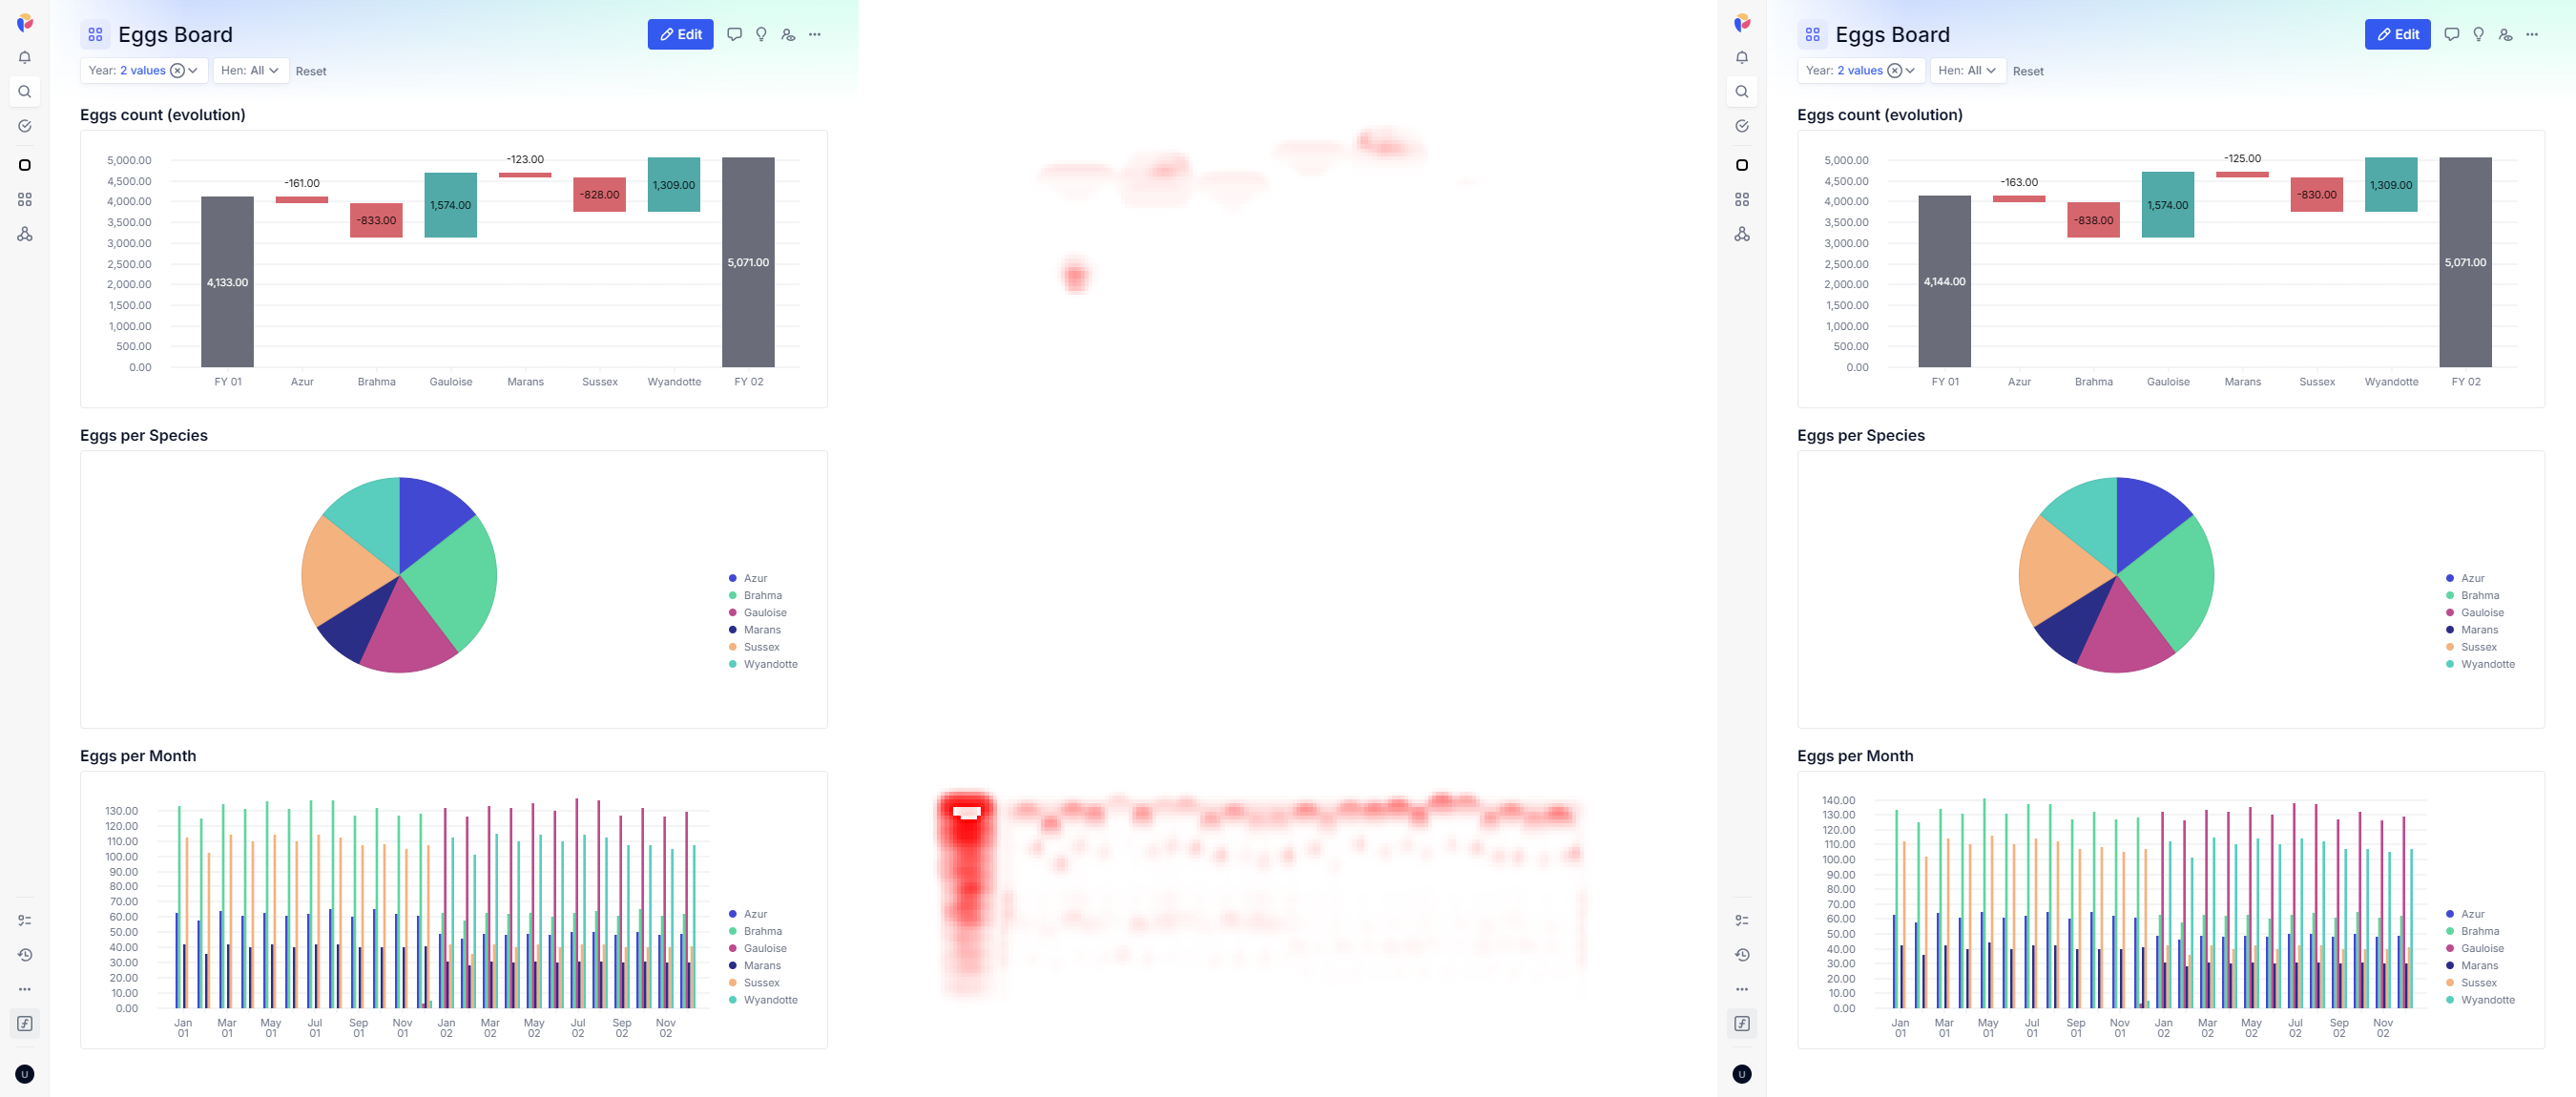
pixelmatchcomparison method works in a straightforward way: you give it a threshold between 0 and 1, which will be used to tell, for every pixel, if the actual pixel matches the expected pixel. A threshold of 0 requires an exact match in color, while higher values allow more variation. Then, you specify a threshold for the whole PNG: how many pixels you accept to be different (either in absolute numbers or as a percentage of the picture). Here's an example where we altered some figures in the dashboard data, causing the graph widgets to differ:
![]()
pixelmatch comparison method- The
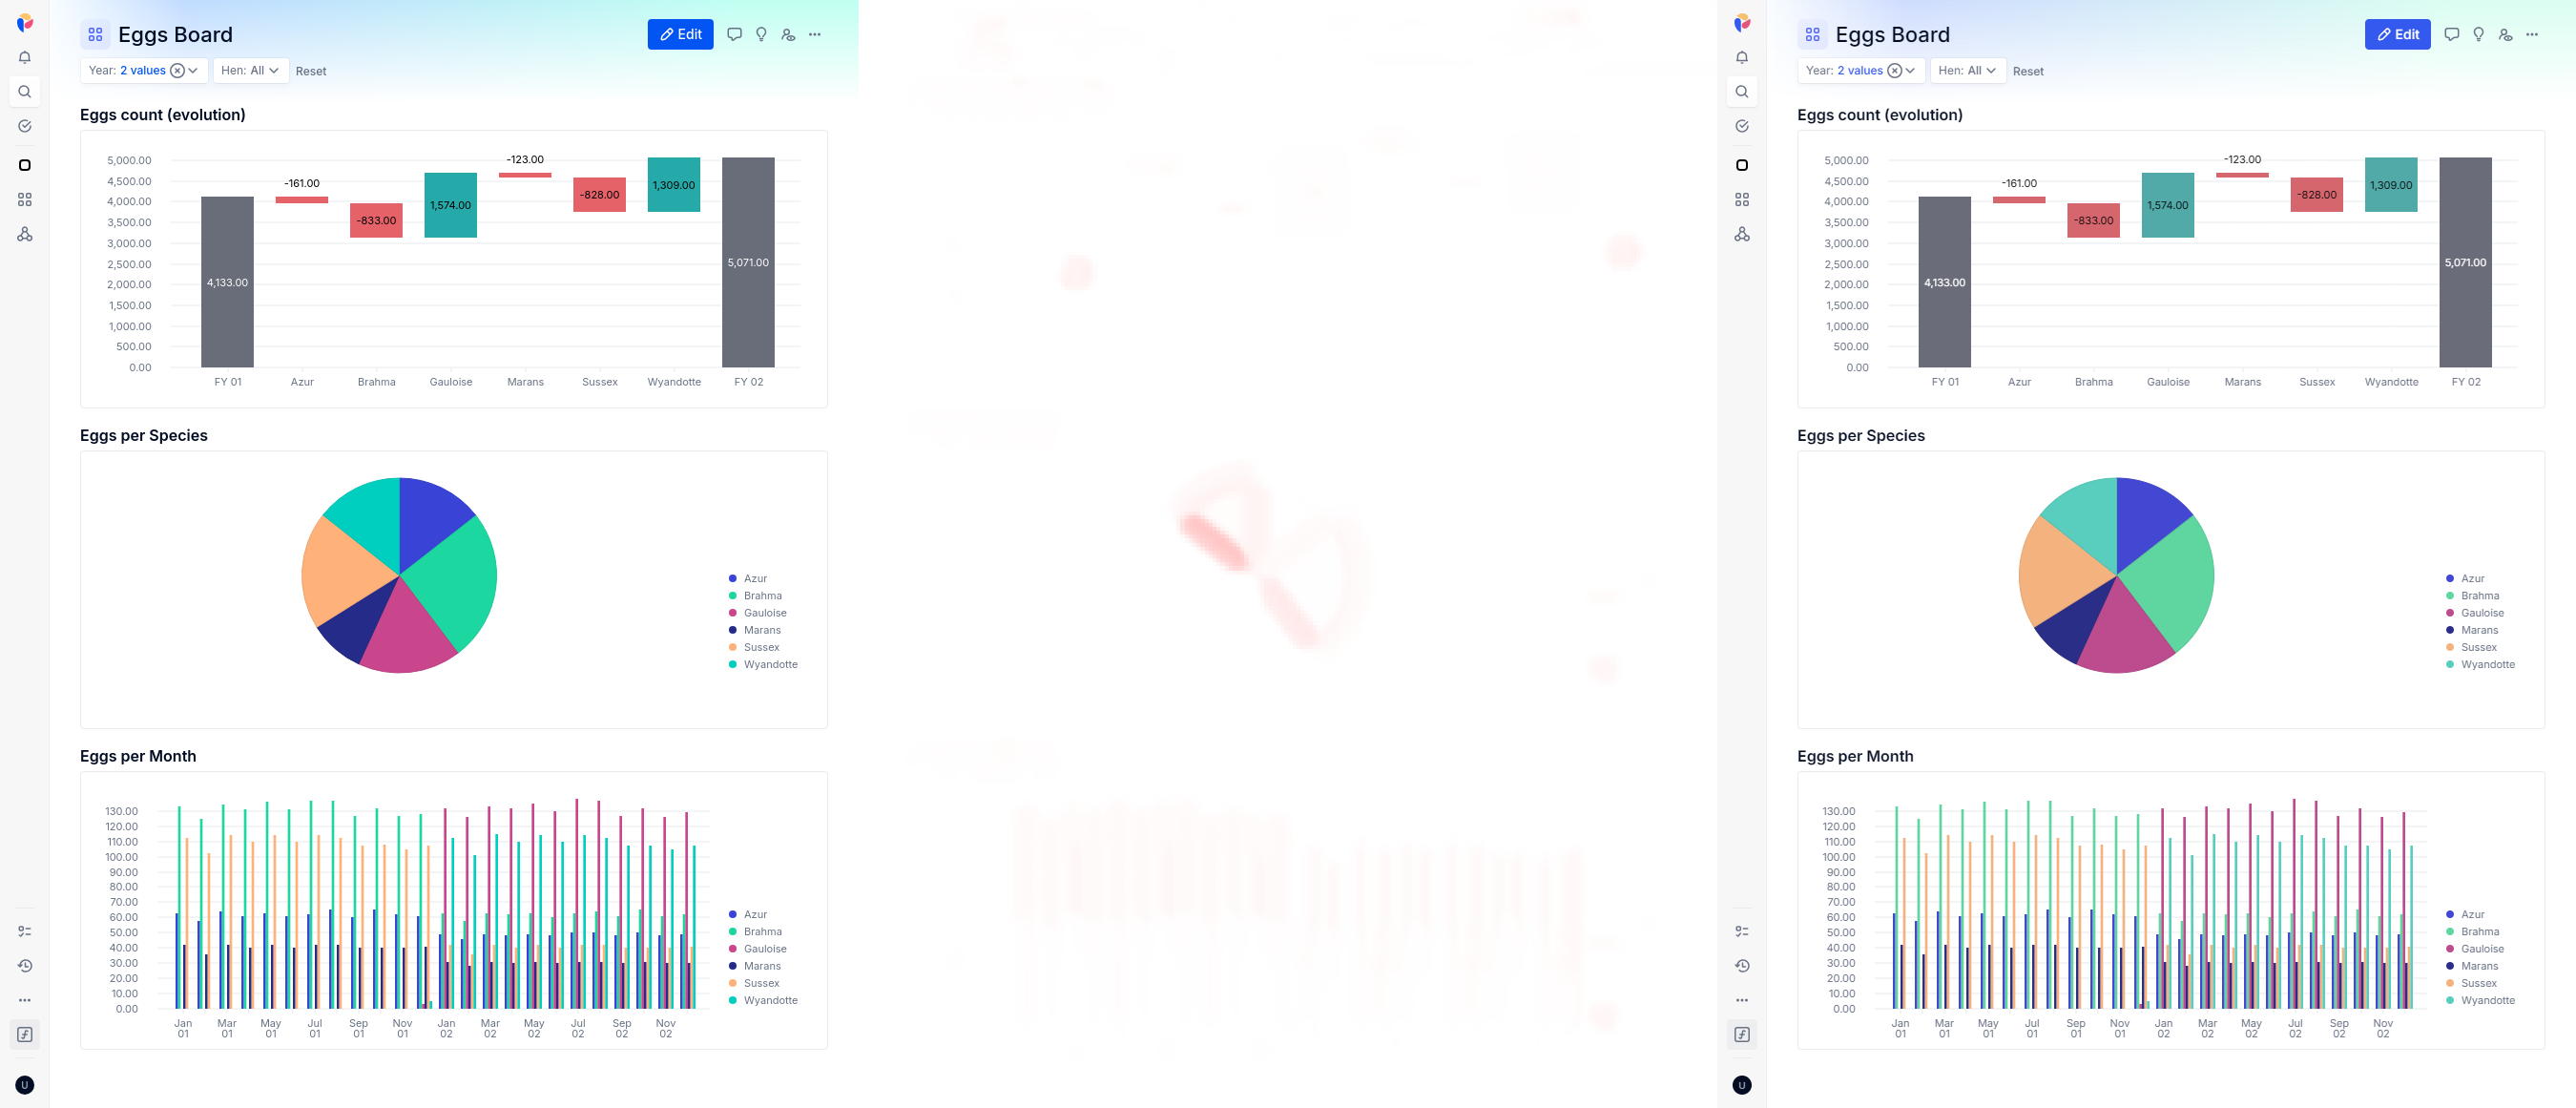
ssimcomparison method, as described injest-image-snapshotthe documentation, « calculates differences in structural similarity by building a moving 'window' over an images pixels ». It is supposed to reduce false positive and be more sensitive to changes in the image. You can read more about the technique in this paper or on Wikipedia. Here is the diff with this comparison method, on the same modified dashboard:
ssim comparison methodThe red areas are more fuzzy, indeed more tailored to the area that changed structurally. The pie chart in the middle seems to not be detected as changed, whereas the pixel-by-pixel comparison above did show some differences. Overall you could argue that this method is less helpful to show what has changed, meaning it could take longer as a developer to find out the cause of the test failure; depending on your use case — whether you're testing graphs, text, or cat pictures — this trade-off may or may not be worth it.
Thresholds
To illustrate the threshold options, let’s use an example where a 1px margin is introduced at the top of the dashboard (a plausible regression when refactoring page layouts). The per-pixel threshold is configured through the pixelmatch option:
  comparisonMethod: "pixelmatch",
  customDiffConfig: {
    threshold: 0.1, // <- that's the per-pixel threshold (defaults to 0.01)
  },
The first diff below is generated with a threshold of 0, meaning the slightest difference in pixel color will trigger the pixel to be off. The second diff is generated with a value of 0.1. You can clearly see in the gradient area at the top of the dashboard that the higher threshold allows for some leeway, and in the second diff, you can see part of the extra margin-top shown in red at the top of the diff:
![]()
0.0 threshold (aka pixel-perfect) detects 88917 different pixels![]()
0.1 threshold detects 9531 different pixelsThe global threshold controls how many pixels must differ before the test fails:
  comparisonMethod: "pixelmatch",
  failureThreshold: 0.03, // <- that's the global threshold: how many different pixels makes the test fails
  failureThresholdType: "percent", // either "percent" or "pixel"
As a final word in this section I would like to mention that it is possible to catch a one-pixel regression: for the diff below, I've set a random pixel to #E0E0E0 instead of white (feel free to open the image below in a new tab if you don't see the red pixel in the zoom box):
![]()
Test on the CI: a new challenge arises
After fine-tuning our options, we were confident enough to try this on our CI pipeline. However, to our surprise, there was a consistent difference on the CI compared to my local stack. A fairly small difference, and you'd be hard pressed to notice it without the diff heatmap, but big enough that it would prevent catching a lot of regressions if we decided to lower the threshold:
There seems to be slight differences in anti-aliasing in the graphs, especially in the pie chart, which I haven't investigated yet. And there are also more subtle differences in font rendering, which can barely be seen even with a strong zoom in. In the image below, you can see that the top text is slightly sharper:

The root of the issue is that Chrome delegates font rendering to the operating system, and in our CI environment runs Ubuntu Docker images, while our development laptop runs Windows.
To work around this issue, we added an optional CI job to regenerate image snapshots when needed. When a legitimate change to a snapshot occurs, we trigger the job manually and we save the newly generated snapshot to our git repository (git lfs is our friend!). While this adds about a minute of manual work, we found it worthwhile as it allows to keep a very low threshold for our image diffs, and we don't need to update the snapshots very often anyway.
Concluding remarks
Looking back on the process of integrating image snapshot testing into our E2E tests, I found it more trial-and-error than expected. It took several hours of tweaking options and thresholds to find the right settings for our needs. That said, the flexibility allows you to tune the system to match your requirements — whether you need pixel-perfect accuracy or some room for visual variance.
In addition, the approach of image snapshots does come with a couple of drawbacks worthy of mention. It adds a bit of maintenance, as every now and again a legitimate change will require you to regenerate and update some snapshots. Furthermore, after a few months of using this in our CI pipeline, we've had a few bumps of Cypress' version that changed slightly the size of the snapshots, for some reasons. Another aspect to take into account is that it is more difficult to track the cause of a regression from an image diff than from an html diff that you could get with jest's snapshot testing.
But overall we feel that the use of image snapshot testing in our E2E tests suite is a great addition, giving us more confidence that we are not unintentionally introducing visual regressions in our applications.